

How to add a single photo over multiple clipping masks in Corjl
Okay! You’ve picked out your pretty, sparkly word photo collage template. And you’re already to start editing your personalized collage. Even found that. one. perfect. photo…
Wait, oh no!
Did you say ONE photo?
Not multiple photos, just one photo? But that template has a clipping mask for each individual photo letter 😬!? Lining up the same duplicated image in multiple clipping masks for an entire word will take FOREVER!

Don’t worry, I’ve got your back! It is absolutely possible (and easy) to hack your favourite multiple mask collage template in Corjl and feature your one and only perfect sparkling photo. Honest, I wouldn’t lie about this!
Let’s open that template
Go ahead and open your email from Corjl to get the direct link for your template. Then just complete the login/registering process at Corjl.


If you didn't get the email, no worries! Just head over to Corjl.com/orders and open the template with your order number and email address.
Are you ready? Okay, let’s go!
First, set that background!
Setting the template’s background is SUPER important! We’ll start by clicking on the Edit Background button. It’s over there, in the tools panel on the right.

Now let’s change the colour. We want an opaque, white background. When the colour panel opens, make sure the Transparent box is unchecked and select white in the colour window. If you want to use the colour hex instead of dragging your cursor on the colour window, type #ffffff in the hex box.

Changing the background will allow your photo to “lighten” or appear over just the letters later on and not over the entire template. If the background is transparent the photo will appear over the background in its original form and the word won’t show up. Don’t worry I’ll explain “lighten” in just a couple minutes.
Once the background is ready, select all the original photos in the template and delete them.
Seriously! I know I always say never to delete the original photos, and most of the time it’s true. But this time it’s different. Trust me, delete them! We don’t want them anymore.
Kick those photos to the curb!

Everything just went blank and it’s kinda scary. It’s okay! We’re right where we need to be.
Now we’re going to add a colour fill to the letters of the collage. Start by selecting all the letters layers from the Layers Panel- not the text, just the letters that are part of the photo word. Feel free to do each layer individually if your not comfortable editing multiple layers at once.

Once selected, go into the styles panel and check the fill. We want the fill colour to be set to black or hex #000000. This will ensure the letters will be the absolute darkest thing under the photo in the template. Next, select the Style Text menu, then click on the Opacity box and drag the anchor to 100.

Quit playing games with my heart
I didn’t forget about the heart, don’t worry! In this template, we have a heart that will be covered by the photo as well. But where did it go, I can’t see it anymore? What do we do?!?
Well we will need to set the colour fill and opacity of the heart. So let’s edit the heart to be able see it again.
First, go select the heart from the Layers Panel and then click the Style Shape menu.
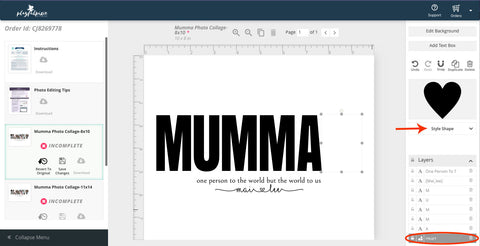
Set the heart fill to black or hex #000000. And make sure the opacity is unchecked or set to 100.

It’s photo time!
Now let’s add the photo! Go to the tools panel on the right and click on Add Photo.

Follow the popup prompts to find your photo and click Save.

With your photo in place, go ahead and adjust the size and placement to your liking by dragging the bounding box anchors.
When you’re ready, select the photo layer from the Layers Panel.

Now we are going to drag the photo layer below any text layers in the Layers Panel - in this case, below the quote and names. The move will make our photo the third layer in this particular template. Moving the layer will keep the text in your colour of choice, otherwise it will be covered by the photo as well. *If you want your text covered by the photo, leave it above the text layers.
If the text layers in your template are below the photo word in the Layers Panel, drag your text layers up above the photo layer instead of dragging the photo layer down.

Let’s make some magic
Don’t worry, we’re almost done! Now select the photo from the Layers Panel and click on the Style Image menu.

Once selected, scroll down until you see the Blend Mode menu and click on it. When the menu drops down, select Lighten from the options.
The Lighten mode will compare the selected layer’s colours to the visible layers beneath, and keep only the lightest colours from each. If the colours are the same, then no change is made. And that’s how the magic happens!

So now, our photo will compare itself to the colours of the white background and black letters below.
And, drumroll please......

Yay! We did it! You can totally do a dance because you did awesome! These kinds of techniques can take a minute to get used to but once you learn it, it can make so many impossible things possible!
Once you love your template, just save, download and print.
Happy editing!


