

How To Use One Photo On Two Clipping Masks In Corjl
Okay! So you just found that sparkly, twinkling photo collage template. Let me guess, you’re already to start editing your personalized collage just to find out that you can only use one photo per letter or shape. ONE. FREAKING. PHOTO.
Wait, what the F@#$!
Did you say ONE photo? Why? I wanted to use the same photo over more than one letter.
You see, when creating a template in Corjl, the designer is only able to add one clipping mask per shape or letter. That is why just one photo can be added to each. What is a clipping mask, you may ask? It's kinda like a cookie cutter, the mask will use the shape it's "clipped" to and cut out the same shape from the photo.
But don't worry, I got you! You can still use the same photo over more than one shape or letter, it just takes a few more steps.
So, let's get started...
Select Your Awesome Photo
First we're going to replace "Photo 1" in our template. So go ahead and select the corresponding layer from the Layers Menu in the editing panel on the right.

Replace Image
Once selected, a new "Replace Image" button should appear at the top of the editing tools panel. Go ahead and click it.

Choose Your Photo
From here, you're going to follow the prompts to select and add your image.


Editing New Photo
Okay! Your awesome photo is in place but is probably not looking so good or at least isn't aligned properly...yet. Don't worry, we're goind to resize and move our photo so it look ah-mazing!

Time to Resize
Look for the grey anchor dots. There are eight around the image block, 4 in the corners and 4 on the mid point of each line. To keep the proportions the same, drag the corner anchors in or out depending on your photo. If you use the mid points anchors, it will only change that side of the image by stretching or squeezing.

Now that the photo size has been adjusted it completely fills out the A mask.

Delete. That. Photo.
Now it's time to delete! I know the 'D' word is scary, but totally necessary in this case. So we're going to delete 'Photo 2'. Yup, go select the layer and then hit the delete icon in your tools panel in the top right.
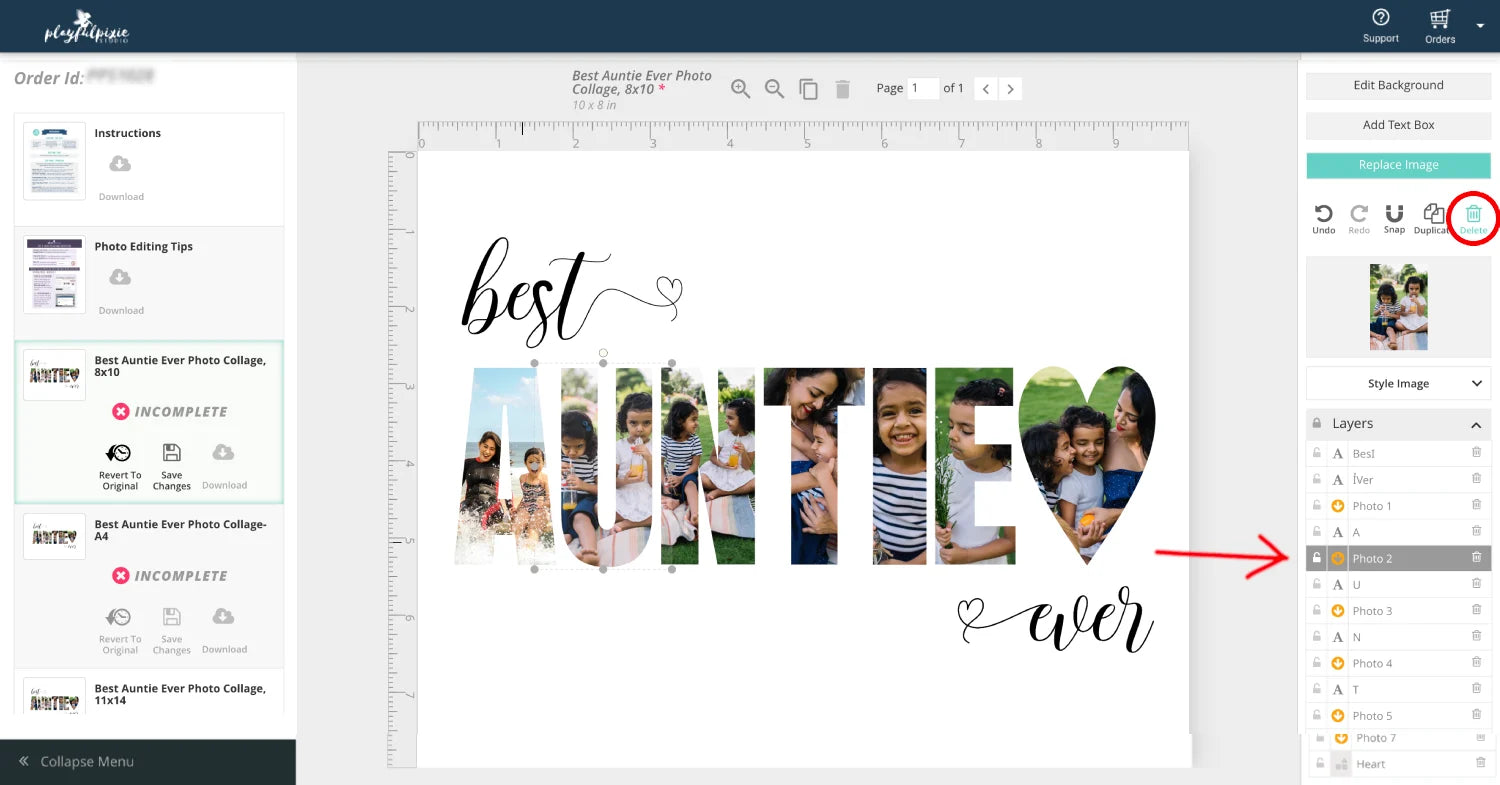
Duplicate Your Awesome Photo
Now that the second photo is gone, it's time to duplicate the photo you added in earlier. First, select 'Photo 1', then click the duplicate icon in your tools panel in the top right.

Move it.
Once the photo is in, it will appear in the top of the layers list, so you will need to drag it down to above your empty mask, in the example it will be above the "U" mask.

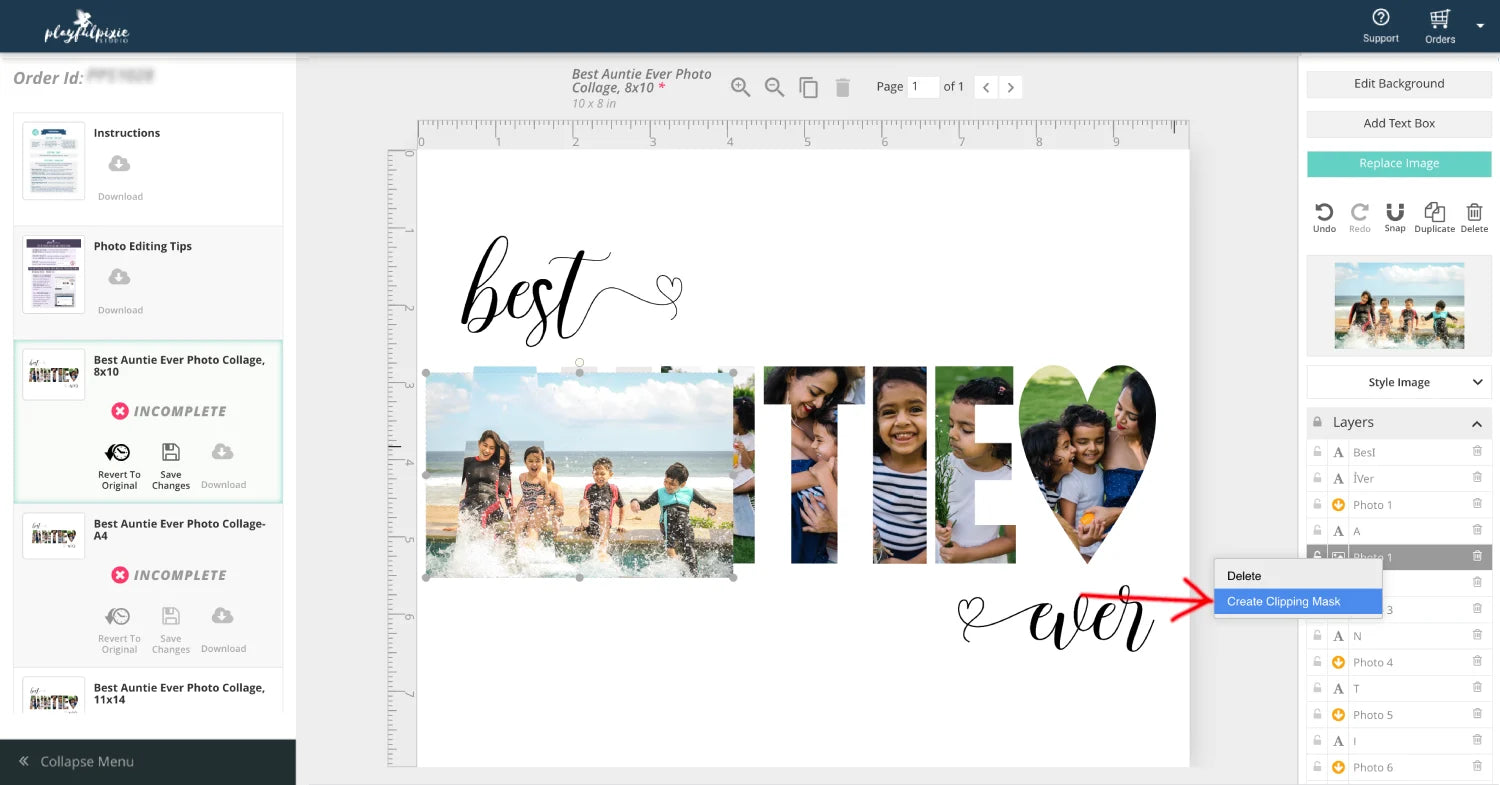
Create Clipping Mask
With the duplicate photo in place, right click on the layer (for mac users, press and hold the Control key and click) then select "Create Clipping Mask" from the pop up menu.
Move it. Move it.
Now the photo should be in the shape of our mask. But chances are that it doesn't look exactly right. That means it's time to move the duplicate photo layer until it makes sense visually with in the "A".

Lock It In Place
Sometimes if multiple layers overlap, the mouse gets confused and doesn't know which layer to select and can select the wrong one. If this happens, there is an easy fix. Select the layer that you DON'T want to move from the Layers Menu. Then click on the lock icon next to the layer. For this template, we'll want to lock 'Photo 1' and the 'A' mask layers, that way they won't be editable and can't move until you unlock them.

Keep Moving
Now, with those pesky layers locked, it's time to move 'Photo 2' until it looks good. You can either use your the arrows on your keyboard or your mouse to move the photo in the design.

Unlock It If you Locked It
Once you're done moving or editing the layer, you can unlock your locked layers.

YOU'RE DONE!!!
And that's it! You've just used you're beautiful photo over two masks in a template. Now you can keep on editing your template.
Happy editing!

P.S. - If you need some extra help editing the rest of the template, here are some helpful tutorials:
How to personalize your photo collage template
How to add a single photo over entire template

