Frequently Asked Questions

How do I edit my template?

Check out the indepth instructions here!

How many times can I edit/download/print an Editable Template

As many times as you want.

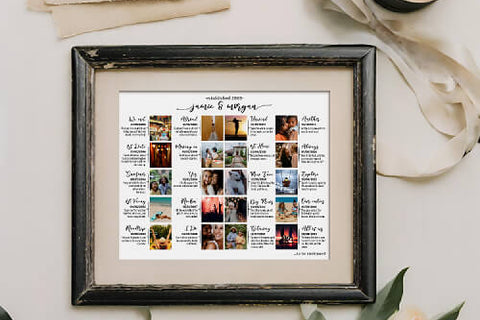
So yes, you can use the same Auntie photo collage template to make separate collages for Auntie Jill and Auntie Nicky.

How do I access my Editable Template?

Check your email (don't forget to check your junk mail). You should have an email from Corjl.com with a direct link to your template.

Or go to Corjl and follow the prompts to access your order.

Can I edit template from a mobile?

As of January 29th, 2024, Corjl has updated it's software and now you can absolutely edit from a mobile.

Corjl has a robust Mobile Editor that allows you to make many of the same edits you would on the desktop version.

Depending on the permissions given for the design, you will see the following options in the bottom menu when you log into your design on a mobile device:

Add Image – Tap here to add an image to the canvas. If the designer has included images for use in the design, you will see those images in the Images tab area. To upload your own image to add to the canvas, tap on the Your Uploads tab and use the “upload” image icon button to upload your image.

Add Text – This option will add a text box to the canvas. Use the text editing options outlined below to style the text as wanted.

Background – Use this option to edit the background of the canvas. Tap to see the following editing options for the background, if allowed by the designer:

Edit Fill Color – Allows you to change the color of the background with a color picker tool. Select a color from the color picker, or type in a hex color value.

Edit Gradient Color – Add a gradient color with this option. Use the two small color boxes to select the two colors for the gradient. Choose from a Linear or Radial gradient. Change the angle of the gradient with the “dial” button or type in an angle in the provided text field. Adjust the opacity start and end with the sliders.

Add Background Image – Use the Image button to add an image to the background. Use designer-provided images (if any) from the Images tab. If allowed, upload your own image to use for the background by going to the Your Uploads tab. Adjust the background image position using the Fill Canvas, Tile Image, or Fit to Canvas options shown.

None – This option removes any image or color applied to the background.


      Edit Text

      When you tap to select text on the canvas, you will see the following menu options at the bottom of the screen. Tap each option to adjust the features. Tap again to close when you are done.

      Edit text – You can begin to edit the text in the design in two ways: double-tap on the text to pull up the keyboard to make edits, or click on the Edit Text button to select all the text at once to delete and replace it with your own.

      Edit color – Allows you to change the color of the text with a color picker tool. Select a color from the color picker, or type in a hex color value.


      Font style – Choose a different font for the text with this option.


      Font size – Change the font size of the text by using the slider to increase or decrease the font size, or by typing in a number for the size in the numerical field. You can also size the text larger or smaller using the corner “dot” controls for the text box.

      Rotation – Use this option to rotate the text box. Use the “dial” in the far left to rotate to the desired amount, or type in the desired amount of rotation in the given text field.

      Duplicate – Make a copy of the text box with this option. Delete – Deletes the selected text box.


      Edit Images

      Tap to select an image on the canvas and use the following options to make adjustments:
      Resize – You can resize a selected image by using the corner “dot” controls to drag the image larger or smaller.

      Replace an Image – If this option is available for the design, you can use the Replace button to replace the selected image. As with the Add Image option, you may see both Images and Your Uploads as options to choose from.


      Rotation, Duplicate, and Delete – These options work the same for images as outlined in the Text options area. Tap to rotate, duplicate, or delete the selected image.


      Top Menu Options


      Designs & Design Pages – This icon button will open the tabs for the Designs in the order and also the Pages in the selected design.

      Tap the Designs tab to view and select from the designs included in the order, as well as any instructions that have been provided.

      • Tap the Edit Design button to open the design in the Editor.
      • The number of Downloads for the design as well as the expiration date (if any) is shown below the design name in this area.


      Tap the Pages tab to view thumbnail images of all the pages in the selected design. Tap the page thumbnail to navigate to that page of the design.

        Use the Revert button at the bottom of the Pages tab to revert the design to its original version. Please note: this will remove all changes and can not be undone.


        Undo/Redo – Use these buttons to “undo” and go back a step or steps in the design, as well as to “redo” or go forward a step or steps if you have backed up too far.

        Save & Download – The Save icon shows that autosave has been initiated for your changes. Use the Download button when you are done editing your design (see next section for more information).

        Account Menu – Tap on the three lines in the upper right corner to open the menu options for your Corjl account. Tap on the available options to view the following information:

        • Account Settings – You can update your account email address by going to the Account Settings area. Type in your current email address, then the desired new email and current password. Tap Update Email to apply the change.
        • Orders – View all of your Corjl orders in this area. New and recent orders will appear under the New Orders tab; older orders can be found by tapping on the Previous Orders tab.


        Saving, Downloading, and Printing Your Design

        Saving Your Changes – Changes to your design will save automatically. To undo changes and go back to a previous edit, click on the Undo button.

        Downloading – When ready to download, tap the “download” icon from the top menu to begin the download process. Select the file type you would like to use for the download file from the pop-up options. Based on your file type selection, you will see the following options:

        PDF File Options

        • Paper Size – In general, if printing with professional printers, choose the Design Default Size. If printing at home, choose 8.5x11 Inches. The size of the design will remain the same regardless of the paper size chosen.
        • Page numbers – By default, all pages of the design will download. To download specific pages of the design, deselect the Select all pages option, then type in page numbers in the provided field. Separate individual pages by commas, or a range of pages with a hyphen.
        • Show Bleed/Trim Marks – Choose to include the bleed and/or trim marks to allow for easier trimming or if requested by your printers.
        • Fit Multiples Per Page – Select this option to fit multiple copies of the design pages onto one sheet of paper (if possible). Pages will tile consecutively on the same page unless the Tile Same Design is selected. For example, if printing a single invitation, front and back, you will want to tile the same design on each PDF page. If printing a design with consecutive pages (like table numbers or a brochure, for example) then you want to deselect this option.

          All Formats Other Than PDF – Depending on the item or seller, you may be able to choose other file download options, such as JPEG, PNG, or SVG. All of these formats will have the same Show Bleed, Show Trim Marks, and page selection options as PDF downloads. Larger designs with a higher number of pages will download in a Zip File by default.


          • After selecting the file type and options, tap the Next button to download the file. On the next screen, you can choose to either download the file directly to your mobile device by tapping the Download to device button, or have the file sent to you by email. If emailing the file, type in your email address in the field labeled Email (found at the top of the screen) then tap Send download link to email.


            Please note: For some mobile devices, such as iPhones, it is recommended to email yourself the file instead of downloading to your device.

            Printing – If you are printing at home, be sure that the file prints at 100% or Actual Size in the print settings (Scale to Fit). If you are printing at a print shop, save the file to a USB flash drive, SD card or email depending on the printer’s requirements. PDF files print best on card stock paper. JPEG files can be printed on card stock or photo paper; be sure that the prints ordered are the same dimensions as the design.

            Approve Proof Option – For orders where your seller will be printing and shipping your order to you, you will see an Approve Proof button instead of the Download button. This indicates that once you are done editing and saving your design, you will need to click on the Approve Proof button in order to complete your order.

            If you are ordering printed items from the seller, clicking the Approve Proof button will alert the seller that your design is done being edited and ready to send to print.

            Please note: You will not be able to make any changes after approving the proof. Please check your information carefully before selecting this option.

            Do I need a Corjl account to access my template?

            Yes. To access the editing features of the editing tool at Corjl an account is needed to login and open the template.


            You will be able to signup to Corjl for free.

            Does my editable template expire on Corjl?

            Yes. All templates expire after 60 days from date of purchase.

            If you need extra time, just contact us and we can help you!

            Do you offer a print service?

            No. Items in the store are digital only.

            We do have a selection of designs on selected products over at Redbubble.

            Will physical items be sent by mail/post?

            No. Everything in the shop is sent digitally.

            How do I open my ZIP folder?

            You can easily unzip ZIP folders by using the built-in software on both Windows and Mac computers.

            Check out this article for step-by-step instructions (with photos) for a look on how to perform this on various systems.

            Are Printable Art items editable?

            No. The printable art in the shop is downloaded "as is".

            Can I combine discounts/coupons?

            Only one discount or coupon code may be used per order.

            What is the refund policy?

            Check out our refund policy for full details.

            What are your business hours/days?

            Monday to Friday from 9am to 6pm

            *UTC - 4h (November to March)

            *UTC - 3h (March to November)

            Closed holidays.

            HAVE ANOTHER QUESTION?

            We would love to hear from you!

            Come chat with us on messenger, by email or send us a question here.